Go ahead and download HP BCU's SoftPaq Exe file. Open it and choose a location where to extract the files. Recommendation: either immediately copy or copy and paste that location somewhere (for example, open up Notepad and paste it there without closing the window) as the utility won't open up by itself. After the extraction has completed, go to the directory where files should reside and make sure that a file named BiosConfigUtility64.exe (BiosConfigUtility.exe if you're using a 32-bit version of Windows) is there.
Then, open a command-line terminal with elevated privileges. The simplest way to do that is to open the Start Menu, type "cmd" in the search bar, then right-click with mouse on the first result and choosing "Run as administrator." After a command-line terminal shows up, you will need to type in this command:
cd C:\where\your\hp bcu\files\reside
Change the boldened directory (C:\ etc.) with the directory where HP BCU files were extracted. If you haven't copied it yet, you can do so by opening the folder with the files, clicking on the address bar and copying its text. Command cd is a shortened version of change directory and that is exactly what we did with this command.
After that, you would like to type in one of these commands:
BiosConfigUtility64.exe /getconfig:config.txt
BiosConfigUtility.exe /getconfig:config.txt
You should choose the first command if your Windows supports 64-bit programs. If you're using a Windows 32-bit version (which is only available in Windows 10) then you would like to use the second command. These commands do the exact same thing - extract all the configuration and specification information from your machine.
If everything went successfully, a file called config.txt should appear in the folder tucked away with all the HP BCU files. Open it using Notepad or other text-editing program of your choice and locate a line called "Ownership Tag." It should look something like this:
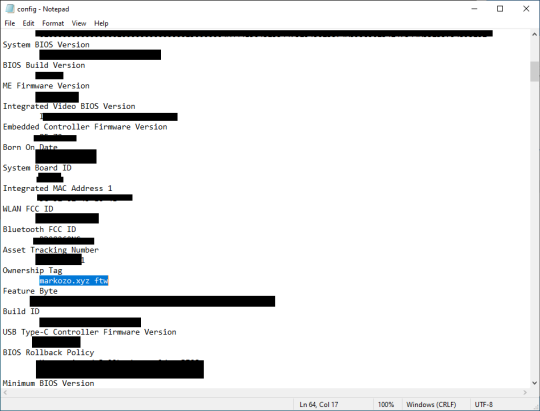
Erase only the text and leave spacing before and after the custom text untouched. Save the file and return to command-line interface. This last step will serve as a BIOS configuration update step, where we will upload a new set of instructions and settings. Hopefully you didn't touch anything else (unless you really know what you're doing!) and you're ready to do the last step, which is to type either of these commands:
BiosConfigUtility64.exe /setconfig:config.txt
BiosConfigUtility.exe /setconfig:config.txt
If all has succeeded, do not hesitate and reboot your machine to see that the ownership tag is no more.